Categories
Uncategorized

Resistor Color coding: How to Remember + Online Calculator

The method to memorize Resistor Color coding using mnemonics is given below.

BBROYGBVGW (0123456789)
BB ROY of Great Britain has a Very Good Wife
i.e., “B” “B” “R” “O” “Y” of “G”reat “B”ritain had a “V”ery “G”ood “W”ife
(or)
Better Be Right Or Your Great Big Venture Goes West

Categories
Uncategorized

AC Circuits: Lead and Lag (How to memorize)

Most of the people I’ve come across have problems memorizing the basics of Electrical Engineering like the phenomenon of Lead and Lag of Current and Voltages in A.C.(Alternate Current) Circuits shown below.

Resistor in AC Circuit

When a Resistor is present in an AC Circuit, then the current is in phase with the voltage and the converse is also true.

Inductor

When an Inductor is present in an AC circuit then Voltage leads current by 90 Degrees.

Capacitor

When a Capacitor is present in an AC circuit then Current leads Voltage by 90 Degrees.

Easy way to memorize the above without any sort of confusion is by recollecting the wordCIVIL every time. CIVIL is a mnemonic here.
Here, we suppose the following
C–>Capacitor
I—>Current
V–>Voltage
I—>Current
L—>Inductor
This implies that in the word CIVIL when C is present, I leads V and when L is present V leads I.

Also Read: Resistor Color coding: How to Remember + Online Calculator

If you have any quiries please feel free to comment below.

Categories
Uncategorized

Remove White Space with Smiley below your Footer – WordPress

I think most you must have faced the same problem with WordPress blogs that somehow tend to show up the messy white space with a horizontal smiley below your footer which makes the whole template go berserk. I wasted a lot of time searching for the right solution, but found none on the web. I finally found the reason why this silly problem persists on one’s WordPress Blog.

This is the reason that WordPress states for displaying that horizontal smiley below your footer creating a void space – ” The image helps collect stats and makes the world a better place but should still work when hidden Smiley face “. Now coming to the removing part, first of all the default Jetpack that comes with the WordPress Blog is responsible for this, so follow the below steps to remove this blank space.

Steps to remove white space with smiley

  • Open the Dashboard of your site and click on Jetpack and select the Jetpack option.
  • Now select the WordPress.com Stats option and click on the Configure button.
  • Now check the button that says Hide the stats smiley face image and click on Save configuration to complete this process.

If you are facing any problems using this method then please don’t forget to mention it in the comments section below.

Categories
Uncategorized

Testing Internet Speed

Well if you have subscribed for a monthly package of 10Mbps or more and are using Windows 7 or 8 then by default you wont be getting the connection speed you were promised of. There is a small trick to get it back as the default settings are set to below 10Mbps in your adapter, this effects your connection speed. To get your original connection speed all you have to do is follow the following steps and you are done.

Steps to increase Internet speed

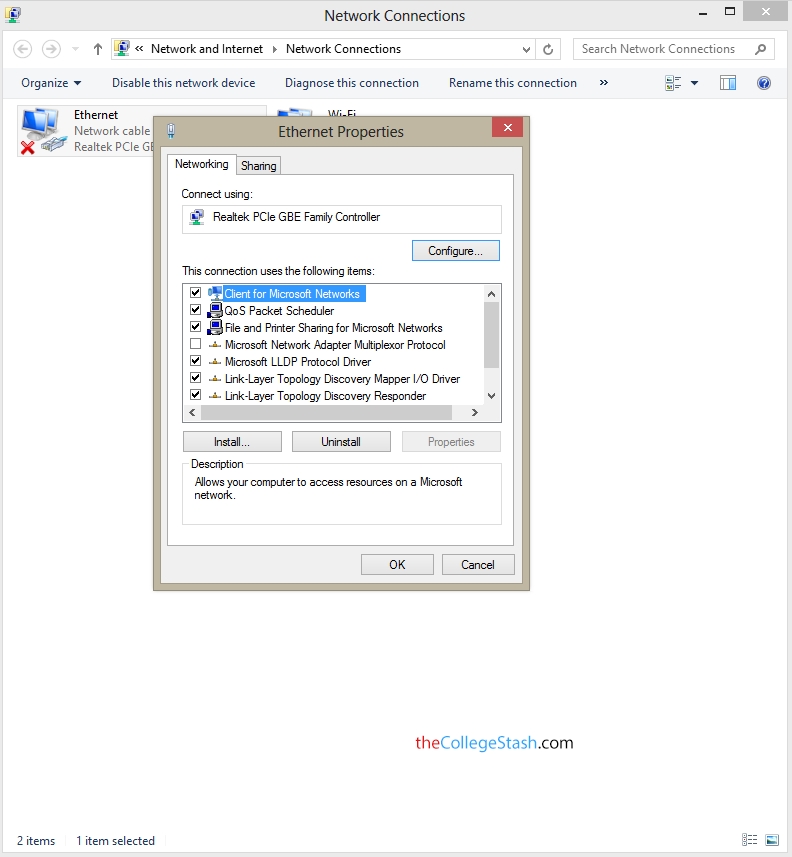
  • Go to your CONTROL PANEL –> NETWORK AND INTERNET –> NETWORK CONNECTIONS and Right-Click on your current Network and select Properties.
  • Open the Networking tab now, click on the Client for Microsoft Networks option and click on the Configure button on the right side of your Dialogue Box.
  • Now select the Advanced tab and select Speed & Duplex.
  • It’s default value is 10Mbps Half Duplex. Change it to Auto Negotiation or 1Gbps Full Duplex and click on OK to save your settings now.

Testing Internet speed

That’s it, now restart your browser and your modem if you have one, that is. Note the this method is only useful for Ethernet Cable connection type of Internet and not WiFi. Download a file now and see the difference in the speed now, your Torrents will also be downloaded faster after the above trick. Please feel free to comment about this below.

Screenshot:
screenshot


Categories
Uncategorized

Laptop Battery backup

Battery backup through the generations has been the main parameter people look for when they are going for portable devices, be it Smartphones or Laptops or Notebooks or Ultrabooks or Tablet PC’s. How to understand Laptop’s Battery backup with its given ratings is a questions that is raised by many today. It depends on two ratings mainly. To choose a device that gives you a better backup you need to know these two ratings given below.

Laptop Battery Rating

  • Whr
  • Ah rating


Whr which is actually Wh is nothing but the SI Unit of Power multiplied byTime(hours, minutes & seconds). For a better understanding let us take an example of the Dell Inspiron 15R laptop it has two options wherein one is a 40Whr battery which comes by default with the laptop and the other is a 65Whr 6-Cell Battery which you will have to buy separately. As the number itself suggests the later configuration gives a longer battery life than the former configuration.
The Second part is that batteries are usually rated in Ah(Amphours). For example a 50Ah battery like the general car battery can give 50Amps for an hour or 10Amps for 5hours, etc. By general knowledge you must have understood by now that Ah is not the amount of power supplied by a battery but instead it is the amount of Amps that is supplies by it. Though generally the batteries are given an Ah rating it doesn’t give the power supplied by the battery because,
                                                    Power = Amps x Volts = Watts

Now, we have to understand that Power is the rate of Energy being supplied, so the product of Power and Time gives you the Energy being given by the Battery.
                                                    Watts x time = total amount of energy supplied

Hope that Whr or Wh and Ah rating make more sense now. So, next time you buy yourself a laptop or any other portable device of that sort, do look for the battery rating.
Categories
Uncategorized

Block a site on your system within 1 Min!

Ever thought of blocking a specific site on your system? Well if you have and don’t know how to, then this tutorial will show you just how easy it is do that! You will need the following first:

  • A Windows PC
  • Administrator account must be logged on. Now go to your Primary Drive where your Operating System has been installed and then go to Windows–>System32–>Drivers–>etc.
    Now in this etc folder you will find a hosts file names host.Copy this host file and paste it anywhere and then open it using a word editor like notepad for example.
    Now add the name of the website you want to block, for example you want to block facebook.com after the line ” 127.0.0.1 localhost  “, add ”127.0.0.1 facebook.com “.This will redirect the user back to your local IP address when ever facebook.com is contacted by the user of that computer. The lines starting with a ” # ” in the host file are all lines meant for commenting as it is already mentioned by default in your host file. Now save the file and then replace the hosts file in the etc folder discussed above with this. You will be asked whether you want to replace it with your new host file, then click on proceed. Now try opening the site in your browser and see the difference for yourself.
Categories
Uncategorized

Install TASM 5 in Windows

Installing TASM in Windows is pretty easy. All you need is a Windows XP or 32-bit windows 7 or 8. If you have 64-Bit versions of Windows 7/8 then you can use this method or you can also install Oracle Virtual Machine or Windows Virtual PC.

What is TASM?

TASM is a Turbo Assembler that is used for Assembly language code to operate on Microprocessors(μP) like the 16 bit 8086.

Installation steps

  • Download this file and extract it’s contents.
  • Then after extracting these files, paste the Disk 2 and Disk 3 folders into the Disk one folder and click on INSTALL.exe
  • Set the required parameters and drive and location path to where the installation Disk 1 folder is located on your system.
  • After the installation is complete now go to the Run in your Start Menu and then access cmd.exe from it(This will open the command prompt).
  • Then after the command prompt window is open now type in the drive where TASM is present and then type in “   d:   ” and press Enter. and then “  cd tasm5  “.

    64-bit TASM

    If you have problems installing TASM on your system, then your system software is incompatible with this version of TASM, which most probably implies that you are running a 64-bit OS for which you will need to download the software separately here,

    Install TASM 64-Bit (Full screen).