• HTTP call in Angular 5

    The approach that will be discussed in this post uses the recommended HttpClient from angular 4.

    login.service.ts

    import {Injectable} from '@angular/core';
    import {HttpClient} from '@angular/common/http';
    import {Observable} from 'rxjs/Observable';
    
    import {LoginObj} from './login-obj';
    // import {ReturnObj} from './return-obj';
    import {baseUrl} from '../backend';
    
    @Injectable()
    export class LoginService {
        
        constructor(private http: HttpClient) {
        }
    
        // submitUser(obj: LoginObj): Observable {
        submitUser(obj: LoginObj): Observable {
            return this.http.post(`${baseUrl}login.php`, obj);
        }
    }
    

    The above login service returns an observable of type any. We can also validate the object being returned by expecting a certain class.
    Now the service needs to be injected into the component that we are going to use.

    login.component.ts

    import {Component, OnInit} from '@angular/core';
    import {Observable} from 'rxjs/Observable';
    
    import {LoginService} from './login.service';
    import {LoginObj} from './login-obj';
    
    @Component({
        selector: 'app-login',
        templateUrl: './login.component.html',
        styleUrls: ['./login.component.scss']
    })
    export class LoginComponent implements OnInit {
    
        loading = false;
        errorMessage = '';
        successMessage = '';
        loginObj = new LoginObj();
       
        constructor(private userLoginSer: LoginService) {}
    
        ngOnInit(): void {}
    
        onLoginSubmit(): void { 
                this.loading = true;
                this.userLoginSer.submitUser(this.loginObj)
                    .finally(() => {
                        // This does exactly what it says, it executes finally irrespective of success, failure.
                        this.loading = false;
                    })
                    .subscribe(returnObj => {
                       this.successMessage = 'Hurray!';
                        },
                        error => {
                            this.errorMessage = 'Sorry! Something went wrong!';
                        },
                          () => {  
                           // onComplete
                           // This runs only if it is a success and after the code in the success block.
                            });
            }
        }
    

    The login and return classes may look somewhat like this,

    login-obj.ts

    export class LoginObj {
        message: string
        constructor() {
        }
    }
    

    return-obj.ts

    export class ReturnObj {
        message: string
        constructor() {
        }
    }
    

    Now we finally need to add the service and component into the app.module.ts.

    The service goes into the providers section, and the component goes into the declarations.

    app.module.ts

    import {NgModule} from '@angular/core';
    
    import {LoginComponent} from './login.component';
    import {LoginService} from './login.service';
    
    @NgModule({
        declarations: [
            LoginComponent,
          ...],
         ....
        providers: [
           LoginService,
           ....
         ],
       ...
    })
    
    export class AppModule {
    }
    
  • How to make reCaptcha v2/ Invisible API call to verify request with PHP 7.1.x

    Make sure that you have listed the domain you are using to run this piece of php code, under the list of allowed domains in your corresponding recaptcha module in google.
    Enter
    recaptcha.php

     $secret, 'response' => $_POST['recaptcha']);
        // use key 'http' even if you send the request to https://...
        $options = array(
            'http' => array(
                'header' => "Content-type: application/x-www-form-urlencoded\r\n",
                'method' => 'POST',
                'content' => http_build_query($data)
            )
        );
        $context = stream_context_create($options);
        $result = file_get_contents($url, false, $context);
        if ($result === FALSE) {
            error_log('https request to Google API failed!');
            echo '{"message" : "Sorry! Something went wrong."}';
        } else {
            $result = json_decode($result, true);
            if (!$result) {
                error_log(json_last_error_msg());
                echo '{"message" : "Sorry! Something went wrong."}';
            } else {
                if ($result["success"] === true) {
                    echo '{"message" : "OK"}';
                } else {
                    error_log("error : " . $result["challenge_ts"]
                        . "hostname : " . $result["hostname"]
                        . "error-codes : " . $result["error-codes"]);
                    echo '{"message" : "Sorry! Something went wrong."}';
                }
            }
        }
    }
    
  • Using preg_match in php 7

    Let us take can example of a function that checks whether a given string is a .edu email address or not.


  • State Management in Angular 5.x using ngrx

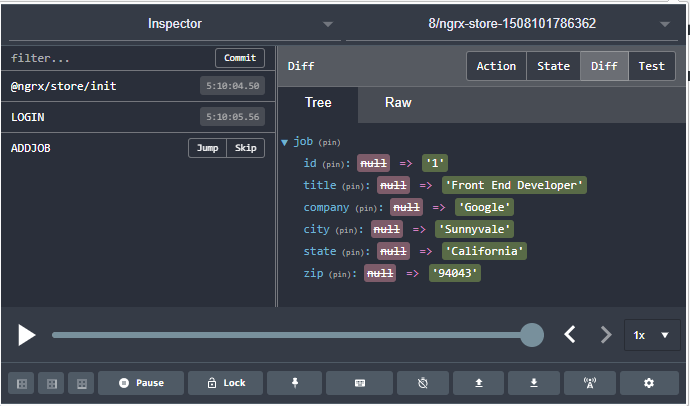
    state management

    job-state.ts

    Let us assume we have a job object with the following properties.

    export interface JobState {
        id: number;
        title: string;
        company: string;
        city: string;
        state: string;
        zip: number;
    }
    

    job-state.ts

    Let us create actions classes by implementing the Action interface and then export them with type All, to avoid type mismatch errors.

    import {Action} from '@ngrx/store';
    
    import {JobState} from './job-state';
    
    export const ADDJOB = 'ADDJOB';
    export const GETJOB = 'GETJOB';
    
    export class AddJobPost implements Action {
        readonly type = ADDJOB;
    
        constructor(public payload: JobState) {
        }
    }
    
    export class GetJobPost implements Action {
        readonly type = GETJOB;
    }
    
    export type All = AddJobPost | GetJobPost;
    

    job.reducer.ts

    Now we need to create the reducer which maps the actions to the correct state.

    import * as PostActions from './job-actions';
    import {JobState} from './job-state';
    
    export type Action = PostActions.All;
    
    const emptyJobState = {
        id: null,
        title: null,
        company: null,
        city: null,
        state: null,
        zip: null,
    };
    
    const newState = (state, newData) => {
        return Object.assign({}, state, newData);
    };
    
    export function jobReducer(state: JobState = emptyJobState, action: Action) {
        switch (action.type) {
            case PostActions.ADDJOB: {
                return newState(state, action.payload);
            }
            case PostActions.GETJOB: {
                return Object.assign({}, state);
            }
            default: {
                return Object.assign({}, state);
            }
        }
    }
    

    app.component.ts

    Now we need to include the reducer in the component, that we can to make use of this functionality. Here let us consider app.component.ts

    import {Component, OnInit} from '@angular/core';
    import {Store} from '@ngrx/store';
    
    import * as PostActions from '../reducers/job-actions';
    import {JobState} from './job-state';
    import {JobStateInterface} from './job-state.interface';
    
    @Component({
        selector: 'app',
        templateUrl: './app.component.html',
        styleUrls: ['./app.component.scss']
    })
    export class AppComponent implements OnInit {
        job: Observable;
        jobs: JobState[];
    
        constructor(private store: Store) {
            this.job = store.select('job');
        }
    
     
        setJob(obj: JobState): void {
            this.store.dispatch(new PostActions.AddJobPost(obj));
        }
    
    }
    

    job-state.interface.ts

    We need to define the interface that the store uses to retrieve the state.

    import {JobState} from './job-state';
    
    export interface JobStateInterface {
        job: JobState;
    }
    

    app.module.ts

    Finally we need to add the reducer to the app.module.ts. There is a nice chrome plugin called redux dev-tools</ that comes in handy to view the current state of the application and manipulate it. You need add the StoreDevtoolsModule line as shown below, after installing and enabling the above plugin in your code.

    // ...
    import {job} from 'job.reducer';
    
    @NgModule({
    // ...
    
     imports: [
            BrowserModule,
            AppRoutingModule,
            FormsModule,
            HttpClientModule,
            StoreModule.forRoot({login: loginReducer, job: jobReducer}),
            StoreDevtoolsModule.instrument({
                maxAge: 25
            }),
    
    // ...
    })
    
    // ...
    
  • Parameterized Pipes for input search in Angular (custom filters)

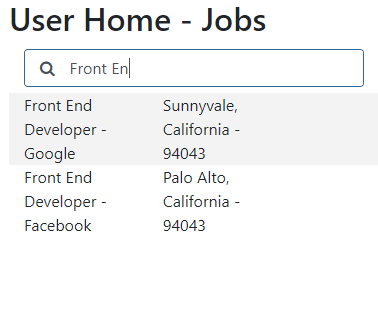
    Lets say we want to filter through a list of jobs that look like the following using an Angular 4.4.5 setup.

    job-state.ts

    export interface JobState {
        id: number;
        title: string;
        company: string;
        city: string;
        state: string;
        zip: number;
    }
    

    jobs filter

    We need to create a custom pipe that takes in the search term as an input parameter for this.

    search-jobs.pipe.ts

    import {Pipe, PipeTransform} from '@angular/core';
    
    import {JobState} from './job-state';
    
    @Pipe({
        name: 'searchJobs'
    })
    export class SearchJobsPipe implements PipeTransform {
        transform(jobs: JobState[], searchText: string): any[] {
            if (!jobs) {
                return [];
            }
            if (!searchText) {
                return jobs;
            }
            searchText = searchText.toLowerCase();
            return jobs.filter(it => {
                return it.title.toLowerCase().includes(searchText) ||
                    it.company.toLowerCase().includes(searchText) || it.city.toLowerCase().includes(searchText) ||
                    it.state.toLowerCase().includes(searchText) || it.zip.toString().toLowerCase().includes(searchText);
            });
        }
    }
    

    app.module.ts

    Now add this app.module.ts to the Declarations part of NgModule, after including the AppComponent where you wish to use this.

    // ...
    
    import {AppComponent} from './app.component';
    import {SearchJobsPipe} from './search-jobs.pipe';
    
    @NgModule({
        //
         ...
    
         declarations: [ AppComponent,
                        SearchJobsPipe 
                      ],
    
        // ....
    }]
    

    app.component.ts

    Make sure you have app.component.ts that is somewhat similar to the base structure here.

    import { Component, OnInit } from '@angular/core';
    import {JobState} from './job-state';
    
    @Component({
      selector: 'app-app1',
      templateUrl: './app1.component.html',
      styleUrls: ['./app1.component.scss']
    })
    export class App1Component implements OnInit {
      jobSearch = '';
      jobs: JobState[];
    
      constructor() { }
    
      ngOnInit() {
         this.getJobs();
      }
    
      getJobs(): void {
      // Make API call here and load the jobs on success 
      // this.jobs = response.data;
      }
    
    }
    

    app.component.html

    Now add the following code into your app.component.html file or your components template.


    {{job.title}} - {{job.company}}
    {{job.city}}, {{job.state}} - {{job.zip}}
  • Add font awesome icons to Bootstrap 4 input

    inline search icon

    Note
    Before you run this code, make sure you have jQuery 3.x, Bootstrap 4.x, and Font Awesome 4.x in the same order.

    HTML

    CSS

    body {
      padding: 12px;
    }
    
    .search-class {
      border: none;
      background: #ffffff;
    }
    
    .icon-search {
      border: 1px solid #f2f2f2;
      border-top-left-radius: .25em;
      border-bottom-left-radius: .25em;
      border-right: none;
      padding-right: 0;
    }
    
    .input-search {
      border: 1px solid #f2f2f2;
      border-top-right-radius: .25em;
      border-bottom-right-radius: .25em;
      border-left: none;
    }
    
    .input-search:focus {
      border-color: #f2f2f2;
    }
    
    .search-class-width {
      max-width: 400px;
    }
    

    Demo

  • Empty json_encode() output in php 7.1.x

    If you have an empty json_encode() and don’t know what the hell just went wrong, then this piece of code is really helpful.

    $json = json_encode(array('message' => 'OK', 'data' => $row["description"]));
    if ($json) {
        echo $json;
    } else {
        error_log(json_last_error_msg());
    }

    If you get an error saying invalid UTF-8 characters or something similar, then all you need to do is set the character set of your database to UTF-8 in the following way.

    connect_errno) {
        echo "Failed to connect to MySQL: (" . $mysqli->connect_errno . ") " . $mysqli->connect_error;
        die();
    }
    
     var_dump($mysqli->get_charset());
    // you should see something like 'latin1'
    
     if (!$mysqli->set_charset("utf8")) {
        error_log("Error loading character set utf8: %s\n", $mysqli->error);
        exit();
    }
    
    var_dump($mysqli->get_charset());
    // you should see something like 'UTF-8'
    
    // Do your stuff here.
    
    $mysqli->close();
    
  • Check if input is a number in PHP 7.1.x

    is_int()

    The is_int() doesn’t tell you if the string is actually a number, instead it returns false.


    If you convert your string numeric into an int and then do this, only then will it work. But there is a problem with this approach, while converting string to an int, we use intval(). This converts strings to 0's.


    is_numeric()

    So the best way to find out whether a variable is an actual numeric or not is to use this php function.


  • Delete Cookies in JavaScript

    Deleting a cookie stored in a browser using JavaScript is very easy. For example if you have a cookie named token in your browser and want to delete it, all you have to do is provide the cookie name and set it to a past date. This deletes it immediately. You can take a look at cookies in chrome’s developer tools.
    Cookies

    function setCookie(name, value, days) {
      var d = new Date();
      d.setTime(d.getTime() + (days * 24 * 60 * 60 * 1000));
      var expires = 'expires=' + d.toUTCString();
      document.cookie = name + '=' + value + ';' + expires + ';path=/';
    }
    
    function deleteCookie(name) {
      document.cookie = name + '=;expires=' + new Date(1970, 0, 1).toUTCString() + ';path=/'
    }
    
    setCookie('token', 'value here', 1);
    
    deleteCookie('token');
    

    Demo

  • Add HTTP Intercepter in Angular 4

    Creating a HTTP Intercepter

    Angular V4.4.4
    We need to inherit the ‘HttpIntercepter’ class and override the ‘intercept’ method to be able to intercept all the HTTP requests you make using ‘HttpClient’.
    auth-interceptor.ts

    import {Injectable} from '@angular/core';
    import {Observable} from 'rxjs/Observable';
    // import 'rxjs/add/operator/do';
    import {HttpEvent, HttpResponse, HttpInterceptor, HttpHandler, HttpRequest} from '@angular/common/http';
     
    @Injectable()
    export class AuthInterceptor implements HttpInterceptor {
      constructor(private auth: AuthService) {}
     
      intercept(req: HttpRequest, next: HttpHandler): Observable> {
        // Clone the request as it is immutable. You can also save the original request in the following way
        // const prevReq = req.clone();
        const authReq = req.clone({headers: req.headers.set('Authorization', 'Bearer ' + getToken())});
        // or you can use the shorter version of the same.
        //const authReq = req.clone({setHeaders: {Authorization: 'Bearer ' + getToken()}});
        // Pass on the cloned request instead of the original request.
        return next.handle(authReq);
        /* you can test the above function by doing a console.log() here. For this you will need to import 'HttpResponse' and the 'do' operator.
         .do(event => {
            if (event instanceof HttpResponse) {    
              console.log(getToken());
            }
          });
       */
      }
    }

    Updating app.module.ts

    Now you need to include the ‘AuthInterceptor’ class as part of our main app module providers after you have imported ‘HTTP_INTERCEPTORS’.
    app.module.ts

    import {NgModule} from '@angular/core';
    import {AuthInterceptor} from './auth-interceptor'
    import {HTTP_INTERCEPTORS} from '@angular/common/http';
    
    @NgModule({
      providers: [{
        provide: HTTP_INTERCEPTORS,
        useClass: AuthInterceptor,
        multi: true,
      }],
    })
    export class AppModule {}